Tuesday, December 18, 2012

Project Eight: Reindeer Gift Bags

I wanted to make ornaments for my son's class this year. If you're wondering where the post is about the ornaments I made off a Pinterest idea, you will not find it here. I tried. I looked. But none of the Pinterest ideas seemed appropriate for 1 year olds to remember their daycare years. But, they needed a cute way to be wrapped. Enter reindeer gift bags!

Here is my model. This is from a site called Room Moms 101: Where you can find ideas for all your school needs. P.S. They did a much better job than me!


Here are my supplies. I had the lunch bags and clothespins on hand. If you read my last post, the wiggly eyes and jingle bells were borrowed from my Reinbeers project. I did not have enough pipe cleaners left for the antlers on the bag, but I felt the clothespins would keep the bags closed better.


I took a brown marker from the kids markers and put some lines. I was trying to be artistic, but I think maybe they just look lazily completed. Keep in mind, these are for 1 year olds.


If you're wondering what is going inside these lovely bags, here it is. Their treat is a package of fruit snacks. And here is my ornament. I ordered these from Oriental Trading Company. You could make a Santa, Snowman or Reindeer. I loved these because there was plenty of room for the kiddos names. They all received a matching rubber ducky, also from Oriental Trading Company.


Here is my first completed bag! They are much simpler than my model, but I wasn't willing to put a lot of time or money into this project. Especially since I know the bags will be thrown away. Oh, and they took very little time to make. A total bonus in my full-day-craftathon!


Here are all the bags. I ran out of supplies for the teacher bags, so I used my red jingle bells and made them some holly. They also got cupcakes, so I doubt they were concerned about not receiving a reindeer bag.


Project Seven: Reinbeer

Christmas is next week! Knowing the clock was ticking away, I made this weekend a very crafty one. On Sunday, I tackled quite a few projects. One of those projects was my "Reinbeers."

My family, like many families, does a name exchange for Christmas. I love exchanging names, but I have a love/hate relationship with the price - $10! That's all we can spend on the gift. It is really hard to spend $10 and not give a really bad gift. Thanks to Pinterest, I decided to give the gift of alcohol. Who doesn't need alcohol during the holidays?

Below is the picture I used as my inspiration. If you type in "Reinbeers" as a search on Pinterest, there are many to choose from!


The supplies for this project are very simple. I purchased my brown pipe cleaners, wiggly eyes and jingle bells at Wal-Mart. I had a very tired toddler with me, so I really do not know how much this project cost. I do remember the pipe cleaners costing .77 cents because my husband laughed about them being cheaper than at the dollar store. (Long story short... I checked out the dollar stores and found items were not cheaper and I had little luck. Very rotten experience.) I did re-purpose the eyes and jingle bells for my next post, so I got two projects out of my supplies!


I simply tied the pipe cleaner around the beer bottle and cut the antlers to match in length. I took a few pipe cleaners and cut them to the same size to complete the points of the antlers. Again, I tied those on. This took no time at all!


And here is my finished product! I hot glued the eyes and bells on for noses. I used all red noses for the bottles so it looked consistent. I think the jingle bells add an extra layer of fun to the project. I think this took me maybe 15 minutes and that was with lots of help from my little guy. This idea would be perfect for a white elephant exchange!


Monday, December 17, 2012

Archives: Button Christmas Tree

Before I started this blog, forcing myself to be a Pinterest Pinup, I tried a few Pinterest projects here and there. This project is from last Christmas. I thought it would be a fun, easy project to do with the kids. Even though it is a year later, I still remember this project vividly and here is why...


First, finding buttons was not an easy task. I went to Michael's and spent a lot on small bags of buttons. I bought about 5 bags and about 3 packs of stick pins. I purchased the three Styrofoam trees and headed home for some crafty fun with my daughters.

I did not plan out the best way to attack the Styrofoam with buttons. We started placing buttons here and there, willy nilly. This was NOT the best approach. I can tell you looking back, we should have started at the bottom with the big buttons and then worked our way up. Mistake number one.

Mistake number two was thinking a 5 and 7 year old would have the patience to pin all these buttons onto the trees. While this seems very simple - take one button, place pin in button, push into Styrofoam, repeat - it was very daunting. The large tree was mine and it took 3 nights to complete. I worked on the tree for a few hours each night. And then I got to finish the two little trees because my daughters lost interest.

Mistake number three was thinking the supplies I purchased were enough. I grossly underestimated the amount of buttons and pins. I had to make about 4 more trips to Michael's and had to drive around to multiple store locations because I bought out all the pins and buttons available at my main store. Let me reiterate how much this project cost - A LOT.

Now, had I known how all of this information ahead of time, I would have purchased bulk buttons from the internet. This Christmas I found Oriental Trading Company sells very large bags at a very reasonable price. I also would have waited to complete such a project with my daughters until they were older.

The upside to this project is my daughters are very pleased and proud of their work. The trees sit on an end table in the living room during the holiday season - a prime spot in the house. They love putting them out and looking at their names on the bottom. And we do receive many compliments on them.

My final thought, if you will... These look adorable and can be much more cost effective, but be prepared to spend much more time than expected completing this craft!


Tuesday, November 27, 2012

Project Six: Cherry Cheesecake Dip


The night before Thanksgiving, I made three desserts. My Pinterest dessert was a Cherry Cheesecake Dip and was pretty easy to make!

The recipe, by Lisa Lohwasser, is:

1 Box Jello No-Bake Cheesecake mix
1 Container Cool Whip
1 Can Cherry Pie Filling

Mix Jello No-Bake Cheesecake mix with one container of Cool Whip. Chill. Top with a can of cherry pie filling. Serve with graham crackers.

Here are my ingredients:


I poured the cheesecake mix into the bowl first. Since it was powder, it would have probably been better to put the Cool Whip into the bowl first. I tried mixing it by hand which did not work well either. My husband grabbed the mixer and that worked much better.

I put the mix into a pretty serving bowl. A packet of graham cracker crumbs also comes with the mix. I planned on garnishing around the edges of the dip, but poured way too much. I went ahead and poured the packet over the top of the dip and put it into the fridge overnight. I waited until right before dinner to pour the cherries.

While the recipe did not call for the graham cracker crumbs, I think it really made the dip. I served with Scooby Snacks graham cracker sticks. Everyone seemed to really like it. I would give this recipe a two thumbs up. It was easy and tasty!

Project Five: Christmas Tree Painting

Yes, yes. I know. I disappeared for awhile. You are all thinking what a great site this is and the POOF! Gone. But let me explain... We had quite the round of sickness hit our house. On top of feeling under the weather, my camera on my iPhone stopped working. And since I am not a technical genius, I only know how to load images from my phone to this site. The good news is I am back! And tis' the season so there will be lots of projects!

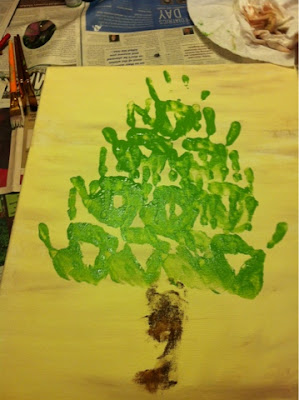
We put our Christmas decorations up over the Thanksgiving weekend. And we have A LOT of decorations. I had one spot in my dining room really needing a picture of sorts. I pinned last year a hand print Christmas tree picture and decided this would be the perfect project!

I always have art supplies on hand, so I did not purchase anything. The canvas I used is from Hobby Lobby and I believe the price tag was about $7 for a pack of two. 


As  you can see below, the paint I use is just craft acrylic paint. This is what I use for all of my paintings. It costs almost nothing and works just as well as the expensive acrylic paint. I have a tendency to waste paint (or let my kids waste the paint), so this is far more economical.


The canvas was a little worn, so i used a mix of cream and brown to make the canvas appear "old". Most of my Christmas decorations have a vintage look and feel, so this was perfect! It did not take long to put a coat of paint on the canvas.


After the canvas was dry, I used my little guys foot to make the trunk of the tree. As you can see below, it isn't the nice, neat, crisp footprint seen on Pinterest. When working with a 15 month old, you take what you can get. I thought he would love Mommy painting his foot, but he was not happy! It took my husband to help hold him and place the footprint.


I learned a very good lesson during the footprint step of this process. I actually painted my son's foot. Genius, right? Wrong. The paint dried very quickly. For the branches, I pour green paint on a paper plate and had my daughter's dip their hands in the paint. They also practiced making a hand print on the newspaper before going straight for the canvas. As you can see, this worked much better. Having older children also helped!


We tried again using my son's hand for the star on top of the tree. As you can see, it went just as well as the base of the tree. The ornaments are thumb and finger prints. My husband and I helped make a few ornaments. I dated the lower right corner and we were done! The picture hangs in the dining room and was the perfect addition! Very little prep or mess to this project. I highly recommend creating a Christmas Tree paining with your kiddos!


Wednesday, September 12, 2012

Project Four: Million Dollar Spaghetti

Let me start by saying that I do not cook. But you just posted a recipe about S'mores Cookie Bars. That is baking. I will bake, but I do not cook. The hubby goes to the grocery store, plans the meals and cooks dinners.

Unfortunately, the hubby went to the BMW Golf Championship which meant I HAD to cook. My goal was to make spaghetti. Quick, easy and no one complains about spaghetti. I realized though that to truly become a Pinterest pin up, I must cook. Sigh.

While looking through Pinterest early this morning, I saw a recipe called Million Dollar Spaghetti pinned from the blog, "Being Grown Up." I read the recipe and thought it was a no brainer. I was already planning to make spaghetti, so why not try this spaghetti on steroids recipe. The recipe:

1 lb of ground beef
1 can of spaghetti sauce
8 oz of cream cheese
1/4 cup of sour cream
1/2 lb of cottage cheese
Whole stick of butter
8 oz spaghetti noodles
Bag of shredded mozzarella cheese

Boil your spaghetti noodles just like you would for regular spaghetti. I am not going to detail how to make noodles. If I can do this part, so can a monkey. Besides, I checked the box today and the directions are on the box. Who knew?

Mix the cottage cheese, cream cheese and sour cream. You can see my lovely mixture below.


Brown the ground beef in the pan. Drain the grease and then add the spaghetti sauce. Totally not complicated.


The recipe calls for pats of butter at the bottom of the pan. This is probably necessary to keep the noodles from sticking while baking. 


The recipe then calls for placing half of the noodles on top of the pats of butter. Now, I think I boo-boo'd. I left the noodles in the water. I recommend draining the noodles to lessen any water going into the pan. It made the mixture a tad bit watery.


The next step is to put the whole bowl of the cheesy mix on top of the noodles. Still a pretty easy recipe.


Place the second half of noodles on top of the cheesy mix. Now, as you can see the recipe calls for MORE butter. The next time around, I am skipping this step. I could feel my arteries hardening as I was cooking.


The last step in putting the dish together is to pour the spaghetti meat sauce on top of the noodles. Bake for 30 minutes at 350 degrees.


Here's where I deviated from the recipe a bit. The online recipe said to bake for 30 minutes, then sprinkle a bag of sharp cheddar and bake again for 15 minutes. I had a bag of mozzarella and substituted that instead. Below is a picture of the full 45 minute bake process.


I think it's funny the recipe is called "Million Dollar Spaghetti." Honestly, a better name is "Poor Man's Lasagna." No matter what you call it, it was very good. A bit runny, but that could be remedied in the noodle step. The kids loved it, especially my little guy. He was all smiles for this meal!


Project Three: S'more Cookie Bars

How do you make a S'more? Now pay attention. First you take the graham. You stick the chocolate on the graham. Then, you roast the mallow. When the mallow's flaming, you stick it on the chocolate. Then you cover it with the other end. Then, you stuff. Kind of messy, but good! 

That is the Ham Porter explanation of making a S'more (highly recommend "The Sandlot"). In our house, we make S'mores in the microwave. Yes, when my girls discovered that good ol' mom here could make S'mores in the microwave, well I moved to a new level of cool.

While looking at Pinterest, I cannot resist pinning any recipe with S'mores. I decided to try the S'mores Cookie Bars pinned from the blog, "Baked Perfection." The recipe:

1/2 cup butter at room temperature
1/4 cup brown sugar
1/2 cup sugar
1 large egg
1 tsp vanilla extract
1 1/3 cups all purpose flour
3/4 cup graham cracker crumbs
1 tsp baking powder
1/4 tsp salt
2 super sized Hershey's chocolate bars
1 1/2 cups marshmallow fluff

Preheat oven to 350 degrees. Grease an 8 inch square baking pan.

The first part of the directions say to mix together the butter and sugars. Then beat in egg and vanilla. This was super easy. I was moving right along!

Please see my mess below. I usually use my kitchen island when baking. I feel much more organized. Why oh why did I change up my strategy? This is chaos! And add in the 1 year old who is at my feet trying to help. He is super cute but not much of a baker yet. 


The next part of the recipe states to mix together the flour, graham cracker crumbs, baking powder and salt. I put the graham cracker crumbs in first. Without looking, I dumped the flour into the bowl. The wrong bowl. Yep. It went into the butter/sugar bowl. Super, super unhappy about this. But, lesson learned. At the same time, I was trying to clean my dishwasher (see Project Two) and cook dinner (see Project Four). Being a Pinterest pinup still means prioritizing and not trying to do too much at once. Lesson learned, right?

What to do, what to do... I dumped the mix out and started making a bowl of just the dry ingredients. When it was finished I moved it ALL the way to the other side of the kitchen. See below and just trust me that both bowls are far, far away from each other.


Want to hear the big kicker? Eventually, you mix it all together anyway. I dumped the bowl for nothing. I guess next time I'll read the entire recipe more carefully. In my defense, I was trying to use my phone to read the recipe. There are times in life where things should be on paper. Recipes are definitely one of them.

Once everything was mixed together, I placed half of the dough mix at the bottom of the greased pan. Next, both ginormous candy bars sit on top of the mix like in the picture below.


The next layer is the fluff. I apologize that I do not have a picture of this, but I was swearing too much and my fingers were too sticky. This layer was my LEAST favorite to put together. For the top and final layer, place the other half of the dough on top of the fluff. See my S'mores bars in the oven below? Bake for 30 to 35 minutes. I set the timer for 30, but ended up cooking them for 35.After tasting them, I would maybe shoot for 32 to 33 minutes. I think 35 is just a smidge too long.


Here is the finished product! It looks pretty good, but the big test of course is the taste. My kids have already volunteered to be the official taste testers.Though I guess I should taste it too, you know, for the blog.


The taste test went pretty well, for my kids. They loved them, me? Not so much. They were better warmed up for a few seconds in the microwave. After all, a S'more is warm, right? And they are really rich, more so even than a S'more over the open flame. My honest opinion, I would only go through this effort again if my daughters asked for them as a special treat. But I'm going to try and convince them to just stick with the microwave version. 

Project Two: Dishwasher

There are a million things to clean in my house. Who knew that cleaning my dishwasher was another chore to add to the list? But when I saw this on Pinterest, I thought what an easy post to fulfill! The pin was from a site called, "One Good Thing By Jillee." A big thanks to Jillee for posting this on her blog!

Here is a picture of my dishwasher. Now, my dishwasher isn't awful. But my dishes could be much cleaner. No matter what detergent I use, my glasses always look foggy.


Here is a close-up shot of my dishwasher. There is a lot white deposits on the different pieces of the dishwasher. And while I was down here, I completed Jillee's first step: Make sure there is no debris around the drain area. Everything was all clear!


The next step is to place a dishwasher safe cup filled with vinegar on the top rack. The vinegar cleans the dishwasher and can remove any smells. To make it sparkle, set your dishwasher to a normal cycle length, but use the hottest cycle possible.


Here is a close-up shot of after the wash cycle. The dishwasher definitely smelled like vinegar and as you can (maybe) see, the bottom looks a lot cleaner.


Time for the next step! Take a cup of baking soda and sprinkle it on the very bottom of the dishwasher. Run another short cycle, still with hot water. This step is supposed to brighten the dishwasher and remove any stains. Honestly, I did not notice a difference after this cycle.

The most important part of this whole process is how the dishes look. Or how they feel... I did NOT like how my dishes felt when I pulled them out of the dishwasher. I really expected this magical transformation and the beautiful, clear glasses like on the commercials. I'd be the happy woman holding a water spot free wine glass. That isn't exactly what happened. My clear glasses were still foggy and they had a weird feel.

In Jillee's defense, her dishwasher was having major issues when she tried this process. I just wanted my dishes a little cleaner and less filmy. The type of water you have could make a difference too. I will not call this a complete fail, but it will be awhile before I try this again. 

Sunday, September 9, 2012

Project One: Linen Closet!

Ready for Project One? I know I am! I have been excited all week to start my first project. Since it was a busy week, I had to wait until the weekend to adequately tackle this project. Since I dangled my linen closet in my first post, I thought it would be a perfect place to start.

When I opened my linen closet door, I have to shove pillows and blankets back in to shut the door. Classy, eh? Yep. That is my linen closet. Nothing like showing the world the disgusting lack of organization hiding behind closed doors.  


To prepare, I of course looked through Pinterest to see if I could gain any amazing insight. The closets looked great, but there were a few issues. 1. I was not willing to spend a lot of money on containers. 2. My linen closet is just for linens. Lots of the examples were multi-purpose, having bathroom supplies included. Those of course were the most organized looking because it was more interesting than just textiles.

Knowing that I wanted an organized closet, I took a chance on 5 different containers at the dollar store. I liked the color, they seem sturdy and the size was nice. Honestly, I was not sure what to do with them, but knew I would find something. The cost for all five was just $5.

My first course of action was to take EVERYTHING out of the closet. Needless to say, there were items in the closet I had forgotten about or didn't realize lived in there - like four curtain rods.


It felt so good to pull all things out of the closet. It looked so nice. So much potential... Until I looked behind me. The picture below shows all of the items that were in my closet. (Now, I thought about this picture after I started placing a few items back in the closet, but you definitely get the idea.) This is where I sat on a mound of blankets thinking, "What did I do? I have no idea where to go from here." So I just started sorting, folding the items to keep and slowly the project started to take shape. I obviously had to do something because this mess was not going to work.


To pull everything out and start organizing and refolding took about an hour. Seriously! I was amazed too. Then, we took a brief break get rid of some items. The pile below is everything that was far better suited at the local, friendly Goodwill store. We took three huge garbage bags stuffed with pillows, towels, blankets and sheets. Hopefully they find a good home because they can't stay here! 


While we were out, I wanted to head to the store again. Why you ask? Well, there were a few ideas I had. In the closet were three sleeping bags. Amazingly, one of the sleeping bags had a really nice storage sack (not on the bag). Both were living in the closet, just not together. Once I put the sleeping bag in the sack, it looked so nice and would stay looking nice. I wanted the other two sleeping bags in a sack too. I really wanted a few more of the large containers from the dollar store, but it wasn't an absolute must.

First store was Wal-mart. I found the mesh laundry sacks for $1.87. I purchased two for my sleeping bags. I also found a really nice brown laundry basket in the same aisle. My thought was to place the less used blankets in the basket up high in the closet. The basket was $7.97. I purchased two hoping both would fit, but I only used one.

Second store was The Dollar Tree. And they had a ton of the big containers in the same color. Yay! I purchased three more to make a total of five big containers. Now I felt like I could finish my project! 

And the big reveal! How much better does that look? It's ok, you can tell me it's fabulous! Once we returned from the store, there were a few more things to do. The hubby and I refolded the sheets and made sets. He also refolded the down comforter... I had tried, but failed miserably. All of this only took about 45 minutes.


My thought process: The sleeping bags and basket of blankets are on the top shelf because they are the least used items in the closet. Next shelf is my bins each filled with a set of sheets. I did try the idea on Pinterest of putting each set into a pillow case. Honestly, I hated it. I really liked them folded nicely better. All the towels are nicely folded. There are two small bins holding hand towels and wash cloths. The next shelf is extra blankets, another set of sheets and extra pillow cases. I placed the beach towels, extra pillows and extra blanket on the bottom because these are the items my kids need. Now, they can easily pull these items out of the closet without help.

Time: 1 hour 45 minutes + Shopping time
Cost: $8 dollar store containers, $11.71 for mesh bags and laundry basket

Tuesday, September 4, 2012

Welcome!

Not a day goes by where I do not hear the word "Pinterest". It has now become a part of everyday language. Just like google has become an accepted verb, Pinterest has become an accepted way of life. Need an idea for wedding decorations? Go to Pinterest! Throwing a kiddos birthday party? Again, Pinterest! Recipes, quotes, home decor ideas - all can be found on that lovely piece of heaven we call Pinterest.

Thanks to the age of smartphones, I can pore over Pinterest for hours. I look through home decor ideas, holiday ideas and things I can do with my children. Very rarely do I implement these ideas, mind you. No, I look through the categories, voraciously pinning or taking screenshots with my phone. See, if I screenshot the idea and it's on my phone then when I am at the store it should be very easy to fill my cart with the items that will make my home Pinterest pretty! Again, that doesn't happen either.

But I have decided that I am tired of dreaming. I am tired of looking through Pinterest for hours and not accomplishing anything. It is time I become the Pinterest Pin Up girl I aspire to be. It's time I prove (slowly) that I can have an organized linen closet and that I will complete the Halloween footprint and handprint canvas craft with my son before his hands are no longer tiny and cute!

I will try to complete as many Pinterest projects as possible, outlining each one for you. The trials, tribulations - all of these items documented so that others may see that becoming a Pinterest Pin Up is possible.